Welcome | Get started | Dive | Contribute | Topics | Reference | Changes | More
The Lino Polls tutorial
In this tutorial we are going to convert the “Polls” application of Django’s famous Writing your first Django app tutorial into a Lino application. This will illustrate some differences between Lino and Django. A lot of Django know-how applies to Lino as well, but there are also some fundamental differences.
Two parts of the Django tutorial
For this tutorial we ask you to follow parts 1 and 2 of the Django tutorial. But before diving into these documents a couple of remarks about how to read them:
Don’t worry if you find the Write your first view section in part 1 difficult, in Lino you don’t need to write views.
The Explore the free admin functionality section in part 2 shows what you are going to not need with Lino because Lino is an alternative to Django’s Admin interface.
You may also follow the remaining Getting started section of the Django tutorial, but with Lino you won’t need most of the things explained there.
Seat belts fastened? Here we go! Please follow parts 1 and 2 of the Django tutorial now:
Welcome back. I hope you enjoyed the trip. Summary of what you should have done on your computer:
$ cd ~/projects
$ django-admin startproject mysite
$ cd mysite
$ python manage.py startapp polls
$ nano polls/views.py
$ nano polls/urls.py
$ nano mysite/urls.py
$ nano mysite/settings.py
$ nano polls/models.py
$ python manage.py migrate
You should have a set of files in your ~/projects/mysite “directory”:
mysite/
    manage.py
    mysite/
        __init__.py
        settings.py
        urls.py
        wsgi.py
    polls/
        __init__.py
        admin.py
        apps.py
        migrations/
            __init__.py
        models.py
        tests.py
        urls.py
        views.py
From Django to Lino
We now leave the Django world and continue “the Lino way” of writing web applications.
Now delete the following files (feel free to make a backup first):
$ rm mysite/urls.py
$ rm polls/urls.py
$ rm polls/views.py
$ rm polls/admin.py
$ rm polls/apps.py
$ rm -R polls/migrations
It is especially important to delete the migrations directory and its
content because they would interfere with what we are going to show you in this
tutorial. The other files will just become useless.
Some of these files remain unchanged: __init__.py, manage.py
and wsgi.py.
And in the following sections we are going to modify the files
mysite/settings.py and polls/models.py.
The mysite/settings.py file
Please change the contents of your settings.py to the
following:
from lino.projects.std.settings import *


class Site(Site):

    title = "First polls"
    verbose_name = "Lino Polls"
    default_ui = "lino_react.react"

    def get_installed_plugins(self):
        yield super().get_installed_plugins()
        yield 'polls'

    def setup_menu(self, user_type, main, ar=None):
        m = main.add_menu("polls", "Polls")
        m.add_action('polls.Questions')
        m.add_action('polls.Choices')
        super().setup_menu(user_type, main)


SITE = Site(globals())

# your local settings here

DEBUG = True
A few explanations:
Lino uses some tricks to make Django settings files more pleasant to work with, especially if you maintain Lino sites for several customers.
One of the most-used Django settings is
INSTALLED_APPS. In Lino you don’t code this setting directly into yoursettings.pyfile, you override your Site’sget_installed_pluginsmethod. Our example does the equivalent ofINSTALLED_APPS = ['polls'], except that Lino adds some more plugins.The main menu of a Lino application is defined in the
setup_menumethod. At least in the simplest case. More about this in More about the application menu.
We will come back to this in More about the Site class.
The polls/models.py file
Please change the contents of your polls/models.py to the
following:
from django.utils import timezone
from django.db import models
from lino.api import dd
from lino.utils import ONE_DAY
from .ui import *


class Question(dd.Model):
    question_text = models.CharField("Question text", max_length=200)
    pub_date = models.DateTimeField('Date published', default=dd.today)
    hidden = models.BooleanField(
        "Hidden",
        help_text="Whether this poll should not be shown in the main window.",
        default=False)

    class Meta:
        verbose_name = 'Question'
        verbose_name_plural = 'Questions'

    def __str__(self):
        return self.question_text

    def was_published_recently(self):
        return self.pub_date >= dd.now() - ONE_DAY


class Choice(dd.Model):
    question = dd.ForeignKey(Question, on_delete=models.CASCADE)
    choice_text = models.CharField("Choice text", max_length=200)
    votes = models.IntegerField("No. of votes", default=0)

    class Meta:
        verbose_name = 'Choice'
        verbose_name_plural = 'Choices'

    def __str__(self):
        return self.choice_text

    @dd.action(help_text="Click here to vote this.")
    def vote(self, ar):

        def yes(ar):
            self.votes += 1
            self.save()
            return ar.success("Thank you for voting %s" % self,
                              "Voted!",
                              refresh=True)

        if self.votes > 0:
            msg = "%s has already %d votes!" % (self, self.votes)
            msg += "\nDo you still want to vote for it?"
            return ar.confirm(yes, msg)
        return yes(ar)
A few explanations while looking at that file:
The
lino.api.ddmodule is a shortcut to most Lino extensions used by application developers in theirmodels.pymodules.ddstands for “data definition”.dd.Modelis an optional (but recommended) wrapper around Django’s Model class. For this tutorial you could use Django’s models.Model as well, but in general we recommend to usedd.Model.There’s one custom action in our application, defined as the vote method on the
Choicemodel, using thedd.actiondecorator. More about actions in Introduction to actions.
You will soon learn more about these things in Introduction to database models and Introduction to actions.
The polls/ui.py file
Now please create a file named ui.py in the same directory as your
models.py, with the following content.
from lino.api import dd


class Questions(dd.Table):
    model = 'polls.Question'
    order_by = ['pub_date']

    detail_layout = """
    id question_text
    hidden pub_date
    ChoicesByQuestion
    """

    insert_layout = """
    question_text
    hidden
    """


class Choices(dd.Table):
    model = 'polls.Choice'


class ChoicesByQuestion(Choices):
    master_key = 'question'
This file defines three tables for our application. Tables are a new concept in Lino. We will learn more about them in another tutorial Introduction to data tables. For now just note that
we defined one table per model (Questions for the Question model and Choices for the Choice model)
we defined one additional table ChoicesByQuestion which inherits from Choices. This table shows the choices for a given question. We call it a slave table because it depends on its “master” (the given question instance).
Changing the database structure
One more thing before seeing a result. We made a little change in our
database schema after the Django tutorial: in our models.py
file we added the hidden field of a Question
hidden = models.BooleanField(
    "Hidden",
    help_text="Whether this poll should not be shown in the main window.",
    default=False)
You have learned what this means: Django (and Lino) “know” that we added a field named hidden in the Questions table of our database, but the database doesn’t yet know it. If you would run your application now, then you would get some error message about unapplied migrations or some “operational” database error because Lino would ask the database to read or update this field, and the database would answer that there is no field named “hidden”. We must tell our database that the structure has changed.
For the moment we are just going to reinitialize our database, i.e. delete any data you may have manually entered during the Django Polls tutorial and turn the database into a virgin state:
$ python manage.py initdb
The output should be:
We are going to flush your database (/home/luc/projects/mysite/mysite/default.db).
Are you sure (y/n) ? [Y,n]?
`initdb ` started on database /home/luc/projects/mysite/mysite/default.db.
Operations to perform:
  Synchronize unmigrated apps: about, jinja, staticfiles, lino, extjs, bootstrap5
  Apply all migrations: polls
Synchronizing apps without migrations:
  Creating tables...
    Running deferred SQL...
Running migrations:
  Rendering model states... DONE
  Applying polls.0001_initial... OK
Adding a demo fixture
Now we hope that you are a bit frustrated about seeing gone forever all that beautiful data you manually entered during the Django Polls tutorial. This is the moment for introducing you to demo fixtures.
When you develop and maintain a database application, it happens often that you need to change the database structure. Instead of manually filling your demo data again and again after every database change, we prefer writing it once and for all as a fixture. With Lino this is easy and fun because you can write fixtures in Python.
Create a directory named
fixturesin yourpollsdirectory.Create an empty file named
__init__.pyin that directory.Still in the same directory, create another file named
demo.pywith the following content:
from polls.models import Question, Choice


def objects():
    p = Question(question_text="What is your preferred colour?")
    yield p
    yield Choice(choice_text="Blue", question=p)
    yield Choice(choice_text="Red", question=p)
    yield Choice(choice_text="Yellow", question=p)
    yield Choice(choice_text="other", question=p)

    p = Question(question_text="Do you like Django?")
    yield p
    yield Choice(choice_text="Yes", question=p)
    yield Choice(choice_text="No", question=p)
    yield Choice(choice_text="Not yet decided", question=p)

    p = Question(question_text="Do you like ExtJS?")
    yield p
    yield Choice(choice_text="Yes", question=p)
    yield Choice(choice_text="No", question=p)
    yield Choice(choice_text="Not yet decided", question=p)
If you prefer, the following code does exactly the same but has the advantage of being more easy to maintain:
from polls.models import Question, Choice

DATA = """
What is your preferred colour? | Blue | Red | Yellow | other
Do you like Django? | Yes | No | Not yet decided
Do you like ExtJS? | Yes | No | Not yet decided
Which was first? | Checken | Egg | Turkey
"""


def objects():
    for ln in DATA.splitlines():
        if ln:
            a = ln.split('|')
            q = Question(question_text=a[0].strip())
            yield q
            for choice in a[1:]:
                yield Choice(choice_text=choice.strip(), question=q)
Run the following command (from your project directory) to install these fixtures:
$ python manage.py initdb demo
This means “Initialize my database and apply all fixtures named
demo”. The output should be:Operations to perform: Synchronize unmigrated apps: about, jinja, staticfiles, polls, lino, extjs, bootstrap5 Apply all migrations: (none) Synchronizing apps without migrations: Creating tables... Running deferred SQL... Running migrations: No migrations to apply. Loading data from ... Installed 13 object(s) from 1 fixture(s)
You might now want to read more about Python fixtures or Lino’s special approach for migrating data… or simply stay with us and learn by doing!
Starting the web interface
Now we are ready to start the development web server on our project:
$ cd ~/mypy/mysite
$ python manage.py runserver
and point your browser to http://127.0.0.1:8000/ to see your first Lino application running. It should look something like this:q
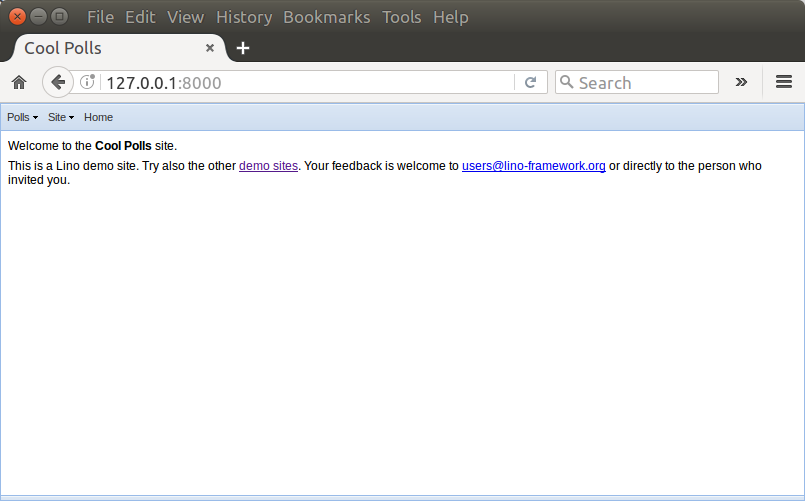
Please play around and check whether everything works as expected before reading on.
The main index
Now let’s customize our main window (or index view, or dashboard).
Lino uses a template named admin_main.html for rendering the HTML to be
displayed there. We are going to override that template.
Please create a directory named mysite/config, and in that
directory create a file named admin_main.html with the
following content:
<div style="margin:5px">
<h1>Recent polls</h1>
<ul>
{% for question in rt.models.polls.Question.objects.filter(hidden=False).order_by('pub_date') %}
<li>
{{question.question_text}}
{% set sep = joiner(" / ") %}
{% for choice in question.choice_set.all() %}
  {{ sep() }}
  {{ choice.vote.as_button(ar, str(choice))}}
{% endfor %}
<br/><small>Published {{fdl(question.pub_date)}}
<br/>Results:
{% set sep = joiner(", ") %}
{% for choice in question.choice_set.all() %}
  {{ sep() }}{{choice.votes}}x {{str(choice)}}
({{100.0 * choice.votes / (question.choice_set.aggregate(Sum('votes'))['votes__sum'] or 1)}} %)
{% endfor %}
</small>
</li>
{% endfor %}
</ul>
</div>
Explanations:
rt.models: is a shortcut to access the models and tables of the application. In plain Django you learned to write:from polls.models import Question
But in Lino we recommend to write:
Question = rt.models.polls.Question
because the former hard-wires the location of the polls plugin. If you do it the plain Django way, you are going to miss plugin inheritence.
If objects, filter() and order_by() are new to you, then please read the Making queries chapter of Django’s documentation. Lino is based on Django, and Django is known for its good documentation. Use it!
If joiner and sep are a riddle to you, you’ll find the solution in Jinja’s Template Designer Documentation. Lino applications replace Django’s template engine by Jinja.
obj.voteis anInstanceActionobject, and we call itsas_buttonmethod which returns a HTML fragment that displays a button-like link which will run the action when clicked. More about this in Introduction to actions.The
fdl()function is a Lino-specific template function. These are currently not well documented, you must consult the code that edefines them, e.g. theget_printable_contextmethod.
As a result, our main window now features a summary of the currently opened polls:

Note that writing your own admin_main.html template is the
easiest but also the most primitive way of bringing content to the
main window. In real world applications you will probably use
dashboard items as described in More about the main page.
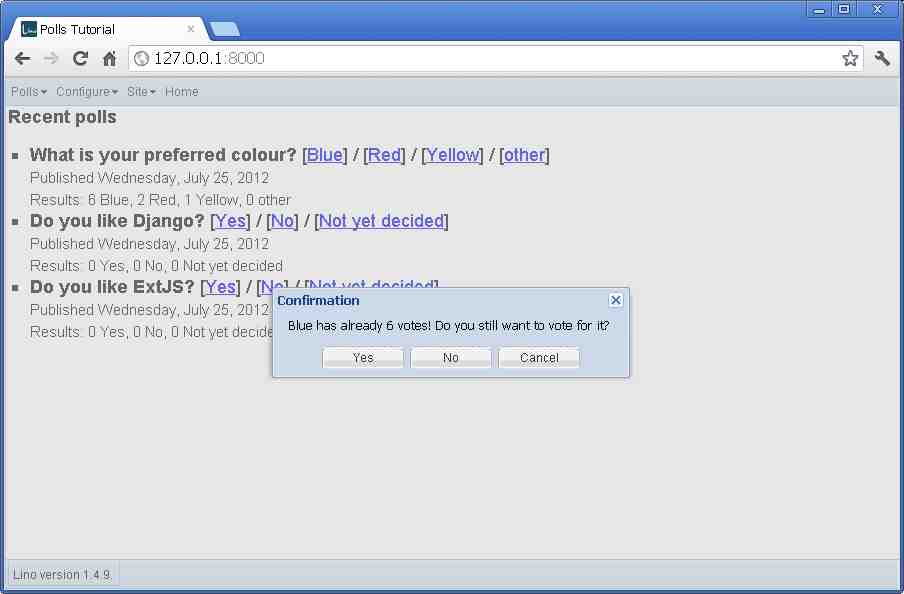
After clicking on a vote, here is the vote method of our Choice model in action:
After selecting in the main menu, Lino opens that table in a grid window:
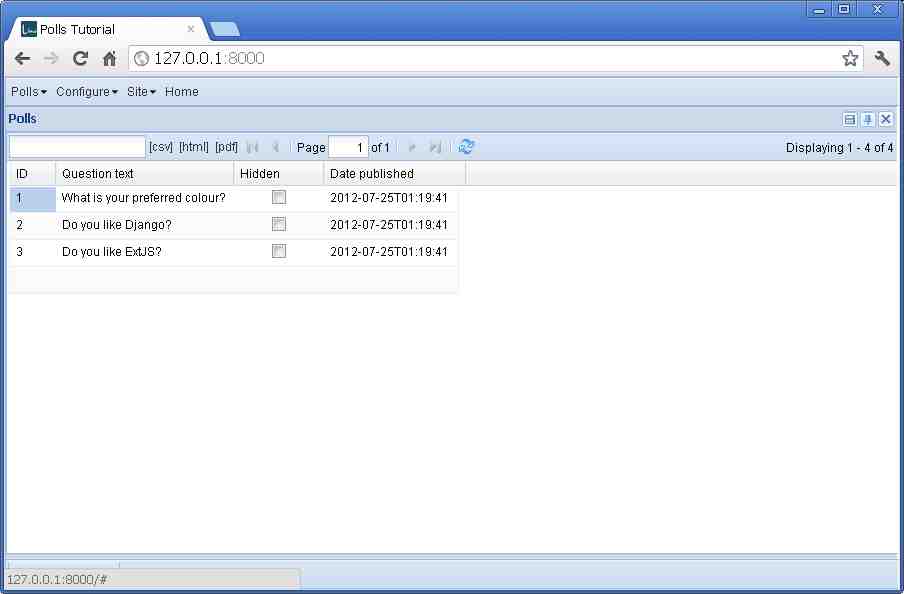
Every table can be displayed in a grid window, a tabular representation with common functionality such as sorting, setting column filters, editing individual cells, and a context menu.
After double-clicking on a row in the previous screen, Lino shows the detail window on that Question:
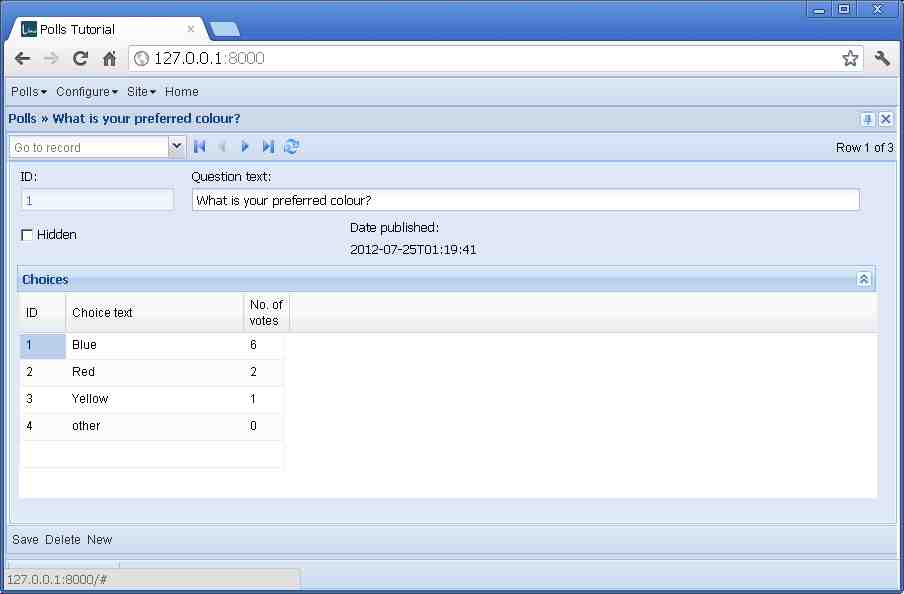
This window has been designed by the following code in your
desktop.py file:
detail_layout = """
id question_text
hidden pub_date
ChoicesByQuestion
"""
Yes, nothing else. To add a detail window to a table, you simply add a
detail_layout attribute
to the Table’s class definition.
Exercise: comment out above lines in your code and observe how the application’s behaviour changes.
Not all tables have a detail window. In our case the Questions table has one, but the Choices and ChoicesByQuestion tables don’t. Double-clicking on a cell of a Question will open the Detail Window, but double-clicking on a cell of a Choice will start cell editing. Note that you can still edit an individual cell of a Question in a grid window by pressing the F2 key.
After clicking the New button, you can admire an Insert Window:
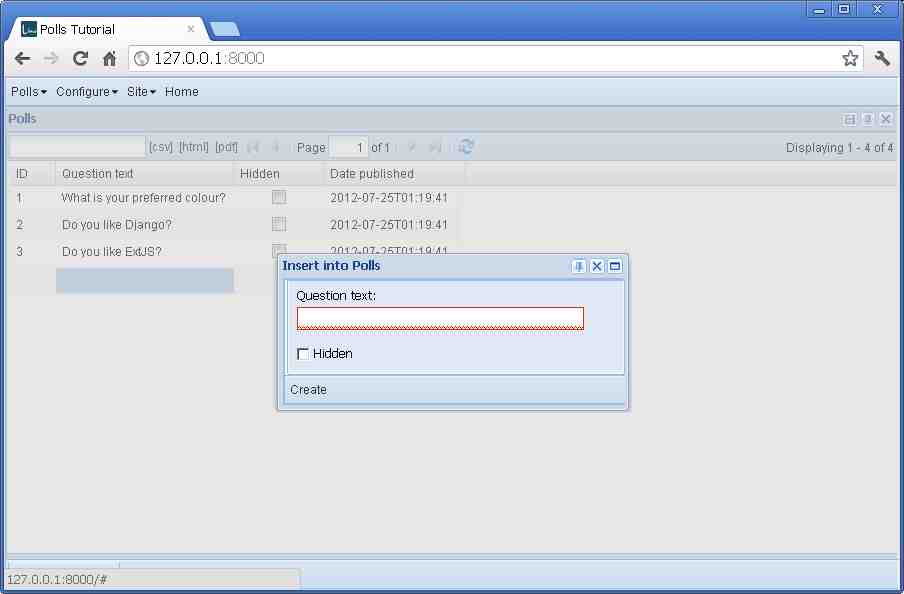
This window layout is defined by the following insert_layout attribute:
insert_layout = """
question
hidden
"""
See Some more layout examples for more explanations.
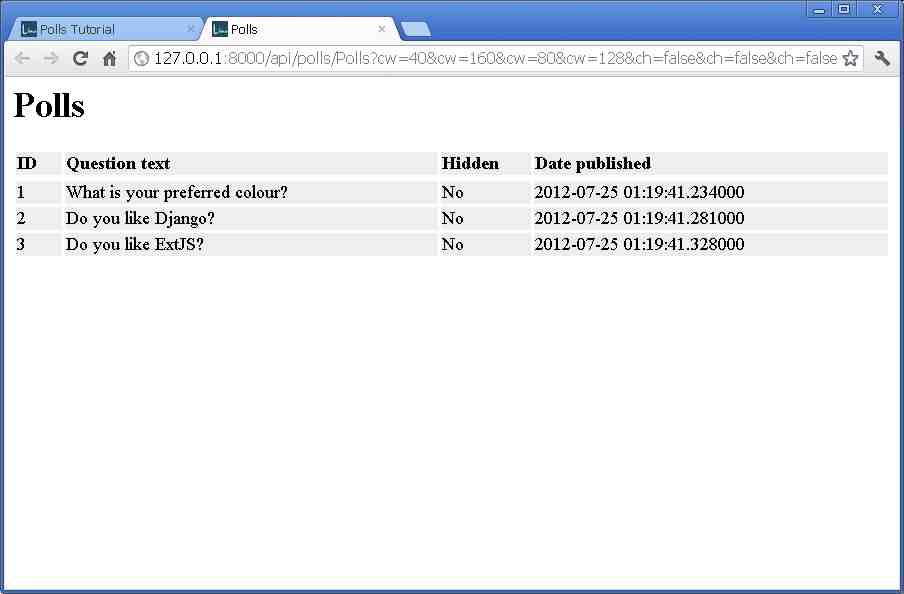
After clicking the [html] button:
Exercises
Add the current score of each choice to the results in your customized
admin_main.htmlfile.Adding more explanations
Imagine that your customer asks you to add a possibility for specifying a longer explanation text for every question. The question’s title should show up in bold, and the longer explanation should come before the “Published…” part
Hint: add a TextField named question_help to your Question model, add this field to the detail_layout of your Questions table, modify your admin_main.html file so that the field content is displayed, optionally modify your
demo.pyfixture, finally runpm prepagain before launchingrunserver.
See solutions to these in lino_book.projects.polls2
Summary
In this tutorial we followed the first two chapters of the Django Tutorial, then converted their result into a Lino application. We learned more about python fixtures, tables, actions, layouts and menus.