Welcome | Get started | Dive | Contribute | Topics | Reference | Changes | More
More about the main page
This page explains how to customize the elements of the main page of a Lino application.
Vocabulary
- dashboard item
An individual item of the dashboard, rendered directly (inline) into the main page because it is considered an important entry point.
This page contains code snippets (lines starting with >>>), which are
being tested during our development workflow. The following
snippet initializes the demo project used throughout this page.
Code snippets in this document are tested using the
lino_book.projects.noi1e demo project.
>>> from lino_book.projects.noi1e.startup import *
Quick links
As the application developer you define quick links by overriding the
setup_quicklinks methods of your
Site class.
For example the lino.modlib.about plugin says:
class Plugin(Plugin):

    def get_quicklinks(site):
        yield 'about.SiteSearch'
Or the lino_noi.lib.noi.settings module says:
class Site(Site):
    ...
    def setup_quicklinks(self, user, tb):
        super().setup_quicklinks(user, tb)
        tb.add_action(self.models.tickets.RefTickets)
        ...
        tb.add_action(
            self.models.tickets.AllTickets.insert_action,
            label=_("Submit a ticket"))
        ...
        a = self.models.users.MySettings.default_action
        tb.add_instance_action(user, action=a, label=_("My settings"))
>>> pprint(settings.SITE.quicklinks.items)
...
[<lino.core.actions.WrappedAction users_Me_detail ('My settings')>,
 <lino.core.actions.WrappedAction tickets_UnassignedTickets_grid>,
 <lino.core.actions.WrappedAction tickets_ActiveTickets_grid>,
 <lino.core.actions.WrappedAction tickets_AllTickets_grid>,
 <lino.core.actions.WrappedAction tickets_AllTickets_insert ('Submit new ticket')>,
 <lino.core.actions.WrappedAction calview_WeeklyView_detail ('Calendar')>,
 <lino.core.actions.WrappedAction search_SiteSearch_grid>]
The admin_main.html template calls
lino.core.Site.get_quicklink_items() to retrieve and then render this
information.
>>> ar = rt.login("robin")
>>> user = ar.get_user()
>>> for ql in settings.SITE.get_quicklink_items(user.user_type):
...     print(tostring(ar.menu_item_button(ql)))
...
<a href="…" title="Edit your user preferences.">My settings</a>
<a href="…" title="Base class for all tables of tickets.">Unassigned Tickets</a>
<a href="…" title="Show all tickets that are in an active state.">Active tickets</a>
<a href="…" title="Shows all tickets.">All tickets</a>
<a href="…" title="Insert a new Ticket.">Submit new ticket</a>
<a href="…" title="Open a detail window on records of calview.">Calendar</a>
<a href="…" title="A virtual table that searches in all database tables.">Search</a>
Welcome messages
As the application developer you have several methods to define welcome messages:
Set
welcome_message_when_countof some table to some value (usually0).For example the
lino_xl.lib.tickets.TicketsToTriageplugin uses this to define the “You have X items in Tickets to triage” message.Define a custom welcome message by overwriting
add_welcome_handlerin theSiteclass of your application.For example the “You are busy with…” message in Lino Noi is
lino_xl.lib.working. Orlino_xl.lib.starsdefines the “Your stars are” message.
The admin_main.html calls get_welcome_messages. This code inserts the “welcome
messages” for this user on this site. get_welcome_messages returns an etree element (see
etgen.html).
>>> ar = rt.login("robin")
>>> print(tostring(settings.SITE.get_welcome_messages(ar)))
...
Your email address (demo@example.com) is not verified, please check your mailbox
and <a href="…" title="Ask for the verification code you have received by email
and mark your email address as verified.">verify now</a> or <a href="…">re-send
our welcome email</a>.<span>Your nicknamed Tickets are <a href="…">daily</a>, <a
href="…">friday</a>, <a href="…">inbox</a>.</span><p><span><a href="…">Jean</a>
is working on: <a href="…" title="Bars have no foo">#87 (Bars have no foo)</a>,
<a href="…" title="No more foo when bar is gone">#90 (No more foo when bar is
gone)</a>.</span><br/><span><a href="…">Luc</a> is working on: <a href="…"
title="'NoneType' object has no attribute 'isocode'">#25 ('NoneType' object has
no attribute 'isocode')</a>, <a href="…" title="How to get bar from foo">#28
(How to get bar from foo)</a>.</span><br/><span><a href="…">Mathieu</a> is
working on: <a href="…" title="Irritating message when bar">#81 (Irritating
message when bar)</a>, <a href="…" title="Default account in invoices per
partner">#84 (Default account in invoices per partner)</a>, <a href="…"
title="Bars have no foo">#87 (Bars have no foo)</a>, <a href="…" title="No more
foo when bar is gone">#90 (No more foo when bar is
gone)</a>.</span></p><span>You have <b>13 items in Tickets to triage</b>.</span>
The dashboard
As the application developer you define which actors are available as dashboard item for your application. You can do this in two different ways:
override the
get_dashboard_itemsof yourPluginclasses.override the
get_dashboard_itemsof yourSiteclass.
This list is hard-coded per application and applies to all users. But Lino respects view permissions, i.e. an item will appear only if the user has permission to see it. For each dashboard item you can specify certain options to influence how Lino renders them. For example they usually don’t appear if the table contains no data.
Independently of how you define the dashboard items for your application, you
can additionally opt to install the lino.modlib.dashboard plugin.
List of available dashboard items
The list of available dashboard items exists also without this plugin.
>>> ar = rt.login("robin")
>>> user = ar.get_user()
>>> pprint(list(settings.SITE.get_dashboard_items(user)))
...
[lino.modlib.comments.ui.RecentComments,
 lino_xl.lib.tickets.ui.MyTickets,
 lino_xl.lib.tickets.ui.TicketsToTriage,
 lino_xl.lib.tickets.ui.MyTicketsToWork,
 lino_xl.lib.working.ui.WorkedHours,
 lino_xl.lib.groups.models.MyGroups,
 lino_xl.lib.accounting.ui.MyMovements,
 lino_xl.lib.accounting.ui.JournalsOverview]
Note that in practice you would probably prefer to not use above list directly, but rather its “processed” form, stored in the user’s preferences:
>>> pprint(user.get_preferences().dashboard_items)
...
[lino.core.dashboard.ActorItem(comments.RecentComments,header_level=2,min_count=1),
 lino.core.dashboard.ActorItem(tickets.MyTickets,header_level=2,min_count=1),
 lino.core.dashboard.ActorItem(tickets.TicketsToTriage,header_level=2,min_count=1),
 lino.core.dashboard.ActorItem(tickets.MyTicketsToWork,header_level=2,min_count=1),
 lino.core.dashboard.ActorItem(working.WorkedHours,header_level=2,min_count=1),
 lino.core.dashboard.ActorItem(groups.MyGroups,header_level=2,min_count=1),
 lino.core.dashboard.ActorItem(accounting.JournalsOverview,header_level=2,min_count=1)]
Behind the scenes
The content of the main page is generated from the admin_main.html
template.
- admin_main_base.html
- admin_main.html
This is the template used to generate the content of the main page. It is split into two files admin_main.html and admin_main_base.html.
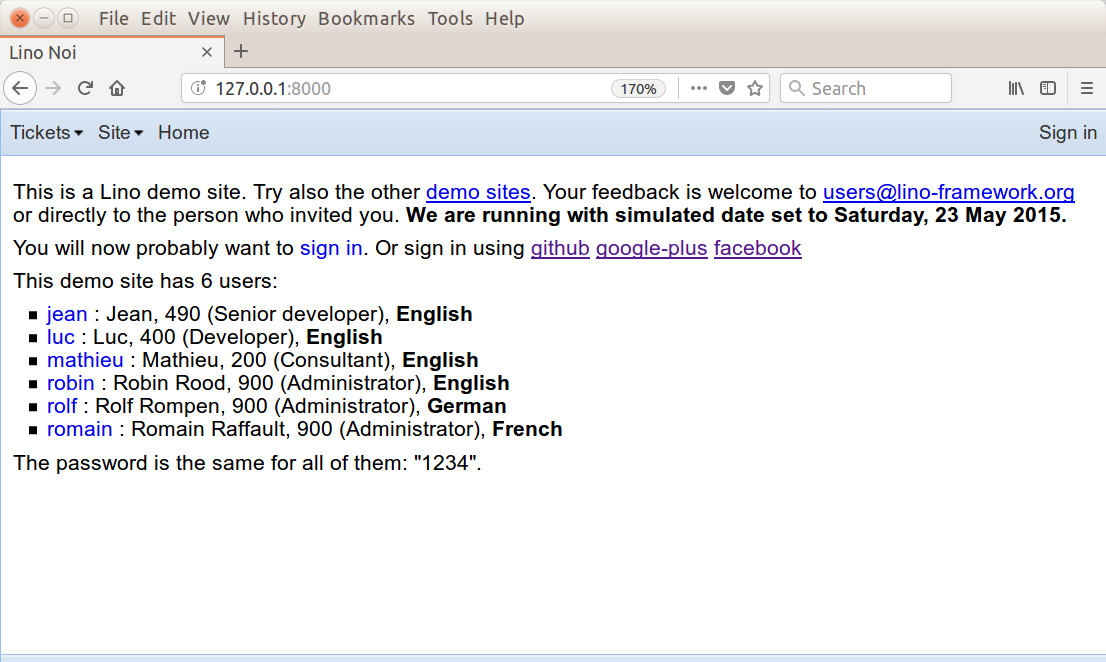
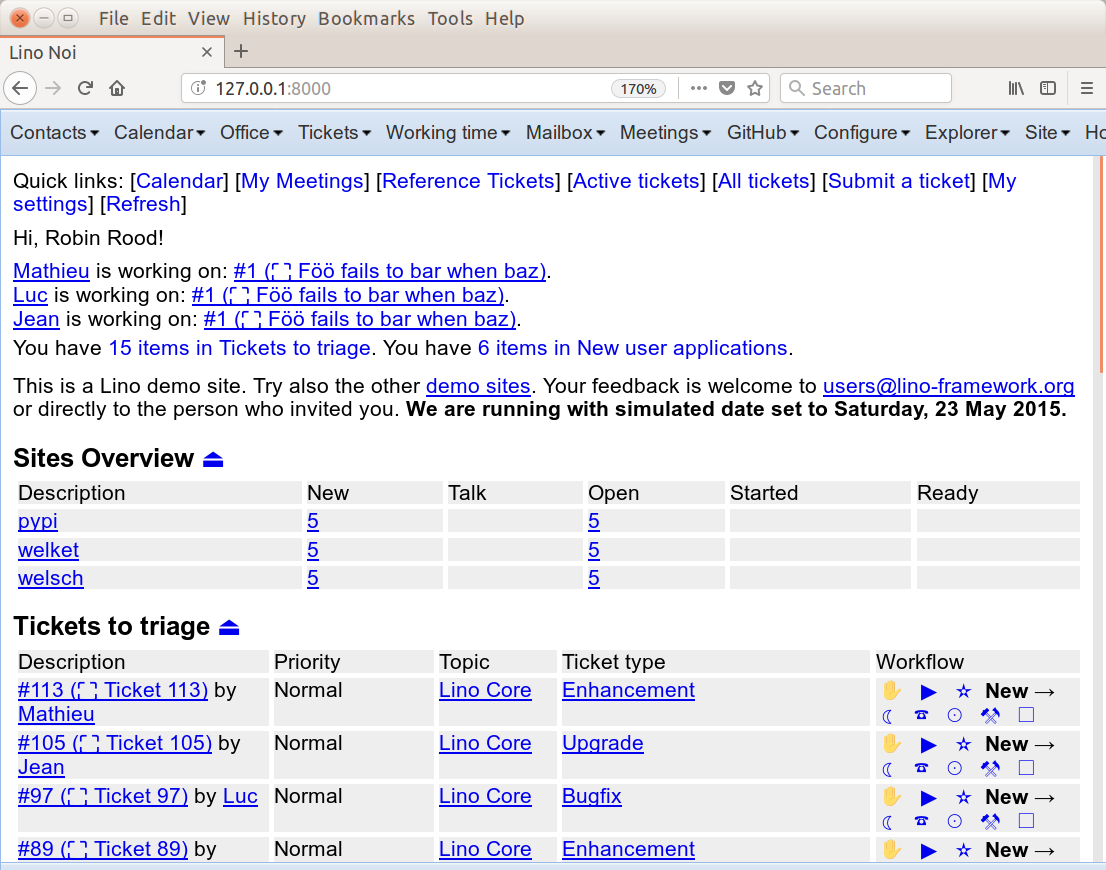
For illustration compare the content of the latter template with its
result in the following screenshots (taken from the noi1e demo project which runs Lino Noi).

Main page for AnonymousUser.

Main page for user robin.
Customizing the main page
You may define a custom admin_main.html template, as we did
in The Lino Polls tutorial. But this was rather an exercise for pedagogical
reasons than something we would recommend to do for application developers.
You may even go further and override the get_main_html method of your Site class to return your own html.