Welcome | Get started | Dive | Contribute | Topics | Reference | Changes | More
Introduction to tables
Tables aren’t models
A table, in Lino, is a Python class that describes how to render a set of data rows.
While a model describes how data is stored in the database, a table describes how data is presented to end users.
While models are known to every Django developer, tables exist only in the Lino framework.
By convention, models are named using the singular form of a noun while tables are named using the plural form.
A same table can be used to render data
interactively in a web front end
as a printable document
in a tested document
When a table is being rendered, this is done using a given display mode.
The default display mode is grid.
Lino differentiates between model-based tables and virtual tables. A model-based table gets its data directly from the database using a Django model, a virtual table has no database model associated, it gets its data programmatically.
Model-based tables are subclasses of
lino.core.dbtables.Table (generally imported via its shortcut
dd.Table), virtual tables are subclasses of
lino.core.tables.VirtualTable (generally imported via its shortcut
dd.VirtualTable).
To define tables, you simply declare their classes. Lino discovers and analyzes
them during site startup. For this to work, tables must be defined in
your models.py. You might prefer to actually define them in a separate
file and import them into your models.py by saying:
from .ui import *
By convention we name such a file ui.py.
Tables never get instantiated.
Each table has a list of actions and a set of layouts.
The remaining part of this page focuses on model-based tables, for virtual tables we have a separate page.
The tables demo project
To illustrate model-based tables, we will
have a look at the tables demo project.
Here are the database models:
from lino.api import dd
from django.db import models
from django.core.exceptions import ValidationError


class Author(dd.Model):
    first_name = models.CharField("First name", max_length=50)
    last_name = models.CharField("Last name", max_length=50)
    country = models.CharField("Country", max_length=50, blank=True)

    def __str__(self):
        return "%s, %s" % (self.last_name, self.first_name)


class Book(dd.Model):
    author = dd.ForeignKey(Author, blank=True, null=True)
    title = models.CharField("Title", max_length=200)
    published = models.IntegerField("Published",
                                    help_text="The year of publication")
    price = models.DecimalField("Price", decimal_places=2, max_digits=10)

    def full_clean(self):
        super(Book, self).full_clean()
        if self.published > 2000 and self.price < 5:
            price = dd.format_currency(self.price)
            msg = "A book from {} for only {}!".format(self.published, price)
            raise ValidationError(msg)


from .ui import *
And here are the tables:
from lino.api import dd


class Authors(dd.Table):
    model = 'Author'
    column_names = 'first_name last_name country'

    detail_layout = """
    first_name last_name country
    BooksByAuthor
    """


class Books(dd.Table):
    model = 'Book'
    column_names = 'author title published *'
    hide_sums = True


class RecentBooks(Books):
    column_names = 'published title author'
    order_by = ['published']


class BooksByAuthor(Books):
    master_key = 'author'
    column_names = 'published title'
    order_by = ['published']
>>> from lino import startup
>>> startup('lino_book.projects.tables.settings')
All tables are globally available at runtime in the lino.api.rt module.
>>> from lino.api import rt, dd
>>> rt.models.tables.Books
lino_book.projects.tables.ui.Books
>>> issubclass(rt.models.tables.Books, dd.Table)
True
A given database model can have multiple tables. For example, there are three
tables based on the Book model: Books, BooksByAuthor
and RecentBooks.
There can be more than one table for a given database model, but each
(model-based) table has exactly one model as its data source. This model is
specified in the model attribute.
For every database model there should be at least one table, otherwise Lino will generate a default table for it during site startup.
Much information about your table is automatically extracted from the model: the columns correspond to the fields of your database model. The header of every column is the verbose_name of its field. The values in a column are of same data type for each row. So Lino knows all these things from your models.
The rows of a table can be sorted and filtered. These things are
done in Django on a QuerySet. Lino forwards them to their
corresponding Django methods: order_by, filter and exclude.
But here is something you cannot express on a Django model: which
columns are to be shown, and how they are ordered. This is defined by
the column_names
attribute, a simple string with a space-separated list of field names.
Tables can hold information that goes beyond a database model or a queryset. For
example we set hide_sums to
True on the Books table because otherwise Lino would display a sum for the
“published” column.
Slave tables
A table is called a slave table when it “depends” on a master.
For example the BooksByAuthor table shows the books written by a
given author. You cannot ask Lino to render the BooksByAuthor table
if you don’t specify for which author you want it. A slave table cannot render
if we don’t define the master.
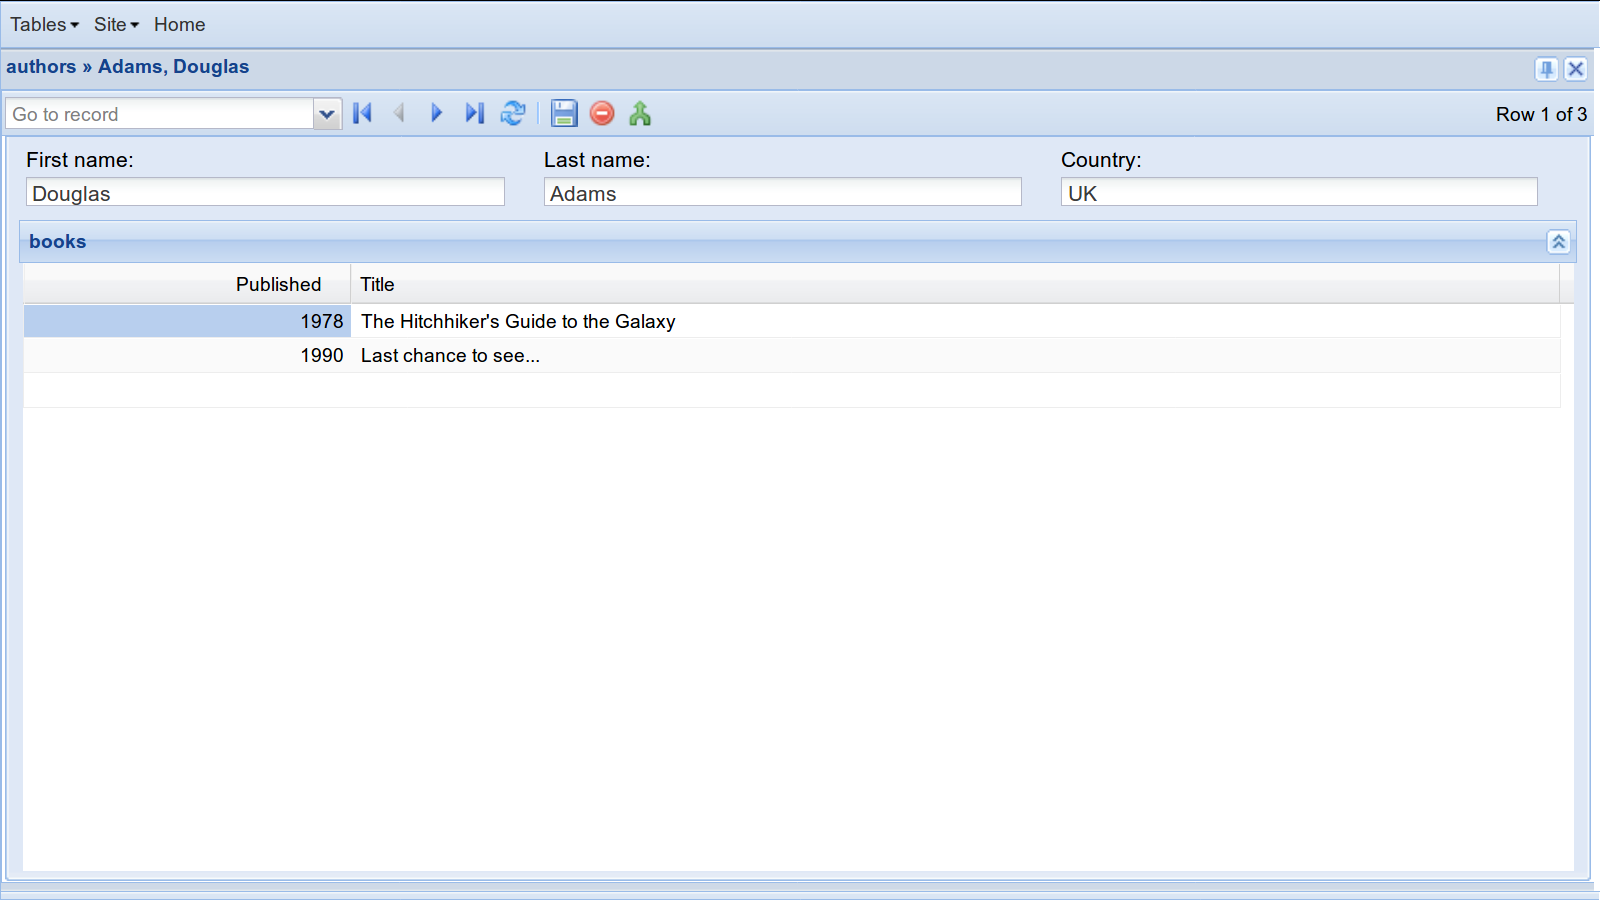
Slave tables are often rendered as elements of a detail layout. In this case Lino renders them in a slave panel widget, and the current record is the master.
See also More about slave tables.
Designing your data
Tables may inherit from other tables. For example, BooksByAuthor
inherits from Books: it is basically a list of books, with the
difference that it shows only the books of a given author.
Each model-based table must have at least one class attribute model, which points to the model on which this table
will “work”. Every row of a table represents an instance of its model.
Since tabless are normal Python classes, they can use inheritance. In our code BooksByAuthor inherits from Books. That’s why we don’t need to explicitly specify a model attribute for BooksByAuthor.
BooksByAuthor is an example of a slave table. It shows the books of a given Author. This given Author is called the “master” of these Books. We also say that a slave table depends on its master.
Lino manages this dependency almost automatically. The application developer
just needs to specify a class attribute master_key. This attribute, when set, must be
a string containing the name of a ForeignKey field of the table’s
model.
A table can define attributes like filter and order_by, which you know from Django’s
QuerySet API.
The columns of a table
An important attribute of a table is column_names, which describes the columns to
show in tabular display modes.
- class lino.core.tables.AbstractTable
- column_names
A string that describes the list of columns of this table.
Default value is
'*', which means to show all columns.Lino will automatically create a
lino.core.layouts.ColumnsLayoutfrom this. This string must not contain any newline characters because a ColumnsLayout’s main panel descriptor must be horizontal.See also
setup_column()andget_column_names().
If given, this is specifies the data elements that should be hidden by default when rendering this table. Example:
hidden_columns = "long_name expected_date"
Value : The default value is an empty set. Application code should specify this as a single string containing a space-separated list of field names. Lino will automatically resolve this during site startup using
lino.core.utils.fields_list(). The runtime value of this attribute is a set of strings, each one the name of a data element.Inheritance : Note that this can be specified either on a
Modelor on aTable. Lino will make a union of both.
Wildcard columns
The asterisk ('*') in a column specifier is a wildcard and means “insert at
this point all columns that have not been named explicitly”. It can be combined
with explicitly specified names. These wildcard columns
If '*' is not present in the string, only explicitly named columns will be
available.
For example:
column_names = "name owner * date"
specifies that name and owner come first, followed by inserted columns and finally by date.
Virtual fields are not included as wildcard field unless they have
lino.core.fields.VirtualField.wildcard_field set to True. This rule is
for performance reasons. Some virtual fields a rather heavy (e.g. the
navigation_panel must query the
whole database to get all primary keys), and even when they are hidden, Lino has
to include wildcard fields in the result because the
end user might have enabled them.
Other table view attributes
But the table is even more than the description of a grid widget. It
also has attributes like detail_layout, which tells it how to display
the detail of a single record in a form view.
Using tables without a web server
An important thing with tables is that they are independent of any front end. You define them once, and you can use them on the console, in a script, in a testcase, in a web interface or in a GUI window.
At this point of our tutorial, we won’t yet fire up a web browser (because we want to explain a few more concepts like menus and layouts before we can do that), but we can already play with our data using Django’s console shell:
$ python manage.py shell
The first thing you do in a shell session is to import
everything from lino.api.shell:
>>> from lino.api.shell import *
This imports especially a name rt which points to the
lino.api.rt module. rt stands for “run time” and it
exposes Lino’s runtime API. In our first session we are going to use
the show method and the actors object.
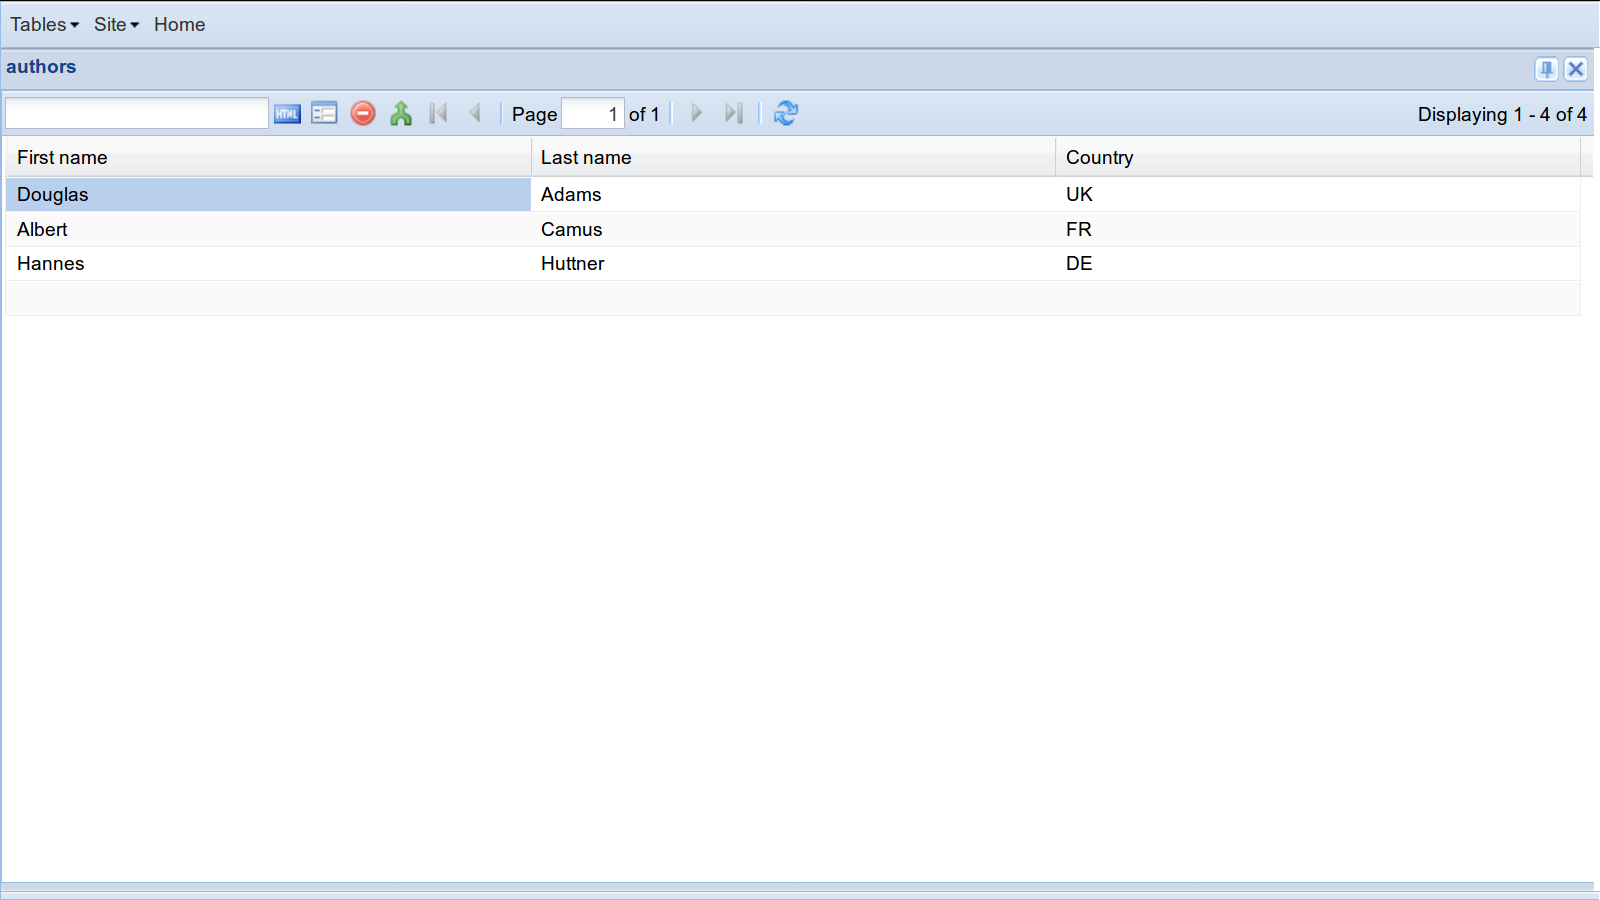
>>> rt.show(tables.Authors)
...
============ =========== =========
 First name   Last name   Country
------------ ----------- ---------
 Douglas      Adams       UK
 Albert       Camus       FR
 Hannes       Huttner     DE
============ =========== =========
So here is, our Authors table, in a testable console format!
And here is the Books table:
>>> rt.show(tables.Books)
...
================= ====================================== ===========
 author            Title                                  Published
----------------- -------------------------------------- -----------
 Adams, Douglas    Last chance to see...                  1990
 Adams, Douglas    The Hitchhiker's Guide to the Galaxy   1978
 Huttner, Hannes   Das Blaue vom Himmel                   1975
 Camus, Albert     L'etranger                             1957
================= ====================================== ===========
These were so-called master tables. We can also show the content of slave tables :
>>> adams = tables.Author.objects.get(last_name="Adams")
>>> rt.show(tables.BooksByAuthor, adams)
...
=========== ======================================
 Published   Title
----------- --------------------------------------
 1978        The Hitchhiker's Guide to the Galaxy
 1990        Last chance to see...
=========== ======================================
Before going on, please note that the preceding code snippets are
tested as part of Lino’s test suite. This means that as a core
developer you can run a command (inv test in case you are
curious) which will parse the source file of this page, execute every
line that starts with >>> and verifies that the output is the same
as in this document. If a single dot changes, the test “fails” and
the developer will find out the reason.
Writing test cases is an important part of software development. It might look less funny than developing cool widgets, but actually these are part of analyzing and describing how your users want their data to be structured. Which is the more important part of software development.
Defining a web interface
The last piece of the user interface is the menu definition, located
in the __init__.py file of this tutorial:
from lino.api import ad, _


class Plugin(ad.Plugin):
    verbose_name = _("Tables")

    def setup_main_menu(self, site, profile, m, ar=None):
        m = m.add_menu(self.app_label, self.verbose_name)
        m.add_action('tables.Authors')
        m.add_action('tables.Books')
Every plugin of a Lino application can define its own subclass of
lino.core.plugin.Plugin, and Lino instantiates these objects
automatically a startup, even before importing your database models.
Note that a plugin corresponds to what Django calls an application. More about this in More about plugins.
Exercises
Explore the application and try to extend it: change things in the code and see what happens.
You can interactively play around with the little application used in this tutorial:
$ go tables
$ python manage.py runserver
Some screenshots:
The fixtures/demo.py file contains the data we used to fill our
database:
from lino.api.shell import *
from lino.utils.instantiator import Instantiator


def objects():
    author = Instantiator('tables.Author',
                          'first_name last_name country').build
    adams = author("Douglas", "Adams", "UK")
    yield adams
    camus = author("Albert", "Camus", "FR")
    yield camus
    huttner = author("Hannes", "Huttner", "DE")
    yield huttner

    book = Instantiator('tables.Book', 'title author published price').build
    yield book("Last chance to see...", adams, 1990, '9.90')
    yield book("The Hitchhiker's Guide to the Galaxy", adams, 1978, '19.90')
    yield book("Das Blaue vom Himmel", huttner, 1975, '14.90')
    yield book("L'etranger", camus, 1957, '6.90')
    # yield book("Book", camus, 2001, '4.90')
Glossary
This page explains the following terms:
- table
A Python class that describes how to render a set of data rows.
- data table
A more specific term for what this document simple calls a table.
- tabular display mode
A display mode that uses columns and rows to display the data. Which means either grid mode or plain mode).
- model-based table
A table that get its data from a database model.
- virtual table
A table that is not connected to any database model. Which means that the application developer is responsible for defining that data.
- wildcard column
A data element that has been inserted by a
*and which is hidden by default. See Wildcard columns.- wildcard field
A database field that is candidate to becoming a wildcard column.