Welcome | Get started | Dive | Contribute | Topics | Reference | Changes | More
Version 1
The database structure
(1) The database structure is one of the first things you can do together with your customer before even starting to write code.
Here is a textual representation of the database structure:
Products : one row for every product or service. A product has a name (description) and a delivery unit.
Members : the people who use this site to register their offers and demands. For each member we record their name and email, and the place where they are located.
An Offer is when a given member declares that they want to sell a given product.
A Demand is when a given member declares that they want to buy a given product.
Each member is located in a given Place because we want to add filtering on offers and demands limited to a place.
(2) Here is a graphical representation of the database structure. There are many methodologies for visualizing a database model (UML, IDEF1X), but the following is our favourite because it is simple, intuitive and useful.
![digraph foo {
graph [renderer="neato"]
node [shape=box]
node [style=filled]
node [fontname="times bold", fillcolor=red]
Product Member
node [fontname="times" fillcolor=gold] Offer Demand
node [fontname="times italic" fillcolor=lightblue] Place
Product -> Offer[arrowhead="inv"]
Product -> Demand[arrowhead="inv"]
Offer -> Member[taillabel="provider", labelangle="-90", labeldistance="2"];
Demand -> Member[taillabel="customer", labelangle="90", labeldistance="2"];
Member -> Place;
}](../../_images/graphviz-48ade61f57a3771d3699b67761bca90280ee8505.png)
(3) Above picture has been realized using graphviz. You might prefer Dia, which produces output like this:
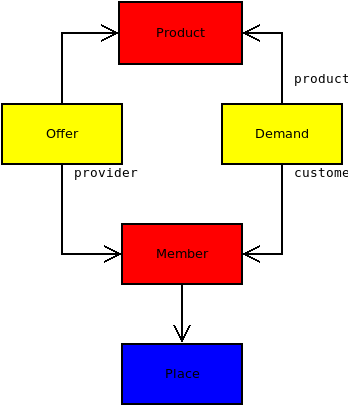
(4) How to read such a diagram:
Every node on the diagram represents a database model.
Every arrow on the diagram represents a foreign key (FK). We sometimes use the word pointer instead of foreign key because that’s more intuitive).
We display the name of a pointer only if it differs from the model it points to. For example the arrow from Offer to Product is a FK field called product, defined on the Offer model. We do not display the name product on our diagram because that would be a waste of place.
We use three colors for grouping the models into three “data categories”:
red is for master data (i.e. relatively stable data)
yellow is for moving data (i.e. data that changes relatively often)
blue is for configuration data (i.e. data that is rather in background and accessible only to site managers)
The main page
(5) The main page or “dashboard” is another thing you can discuss with your customer before even starting to write code. Let’s say that they want it to show a list of products available for exchange. Something like this:
Designation |
Offers |
Demands |
|---|---|---|
Bread |
||
Buckwheat |
||
Eggs |
||
Electricity repair work |
The first prototype
(7) Until here we have been analysts. The job of an analyst is to describe what a software product is supposed to do.
(8) With above information a Lino application developer is able to write a prototype (aka “proof of concept”, “minimum viable product” or “alpha”). For this tutorial we wrote that prototype for you. You can run it by saying:
$ go lets1
$ pm prep
$ runserver
(9) Play with your prototype: create some products, some members, some offers and some demands.
(10) Have a meeting with your mentor where you do a role play: your mentor is the customer who ordered this and you are the developer who presents your prototype.
Use the source, Luke
(11) Now let’s have a look at the source code.
(12) The settings.py file is the first place to look when
you want to discover a Django application. Click on the link below to open the
settings.py file of the lets1 project in your browser:
(13) Open the same file in your editor by saying:
$ go lets1
$ e settings.py
(14) Compare both files. Are they the same?
(15) The settings.py file tells you for example which
plugins are installed. It says:
def get_installed_plugins(self):
    yield super().get_installed_plugins()
    yield 'lino_book.projects.lets1.lib.users'
    yield 'lino_book.projects.lets1.lib.market'
(16) You see that our LETS application has two plugins, “users” and “market”.
(17) Every Lino plugin is a Python package and therefore has an
__init__.py file. Lino expects this file to define a class
object named Plugin, which must be a subclass of
lino.core.plugin.Plugin. The purpose of this class object is to
describe the plugin. You do this by defining menu items, quick links and
dashboard items.
(18) You can see that we use the existing lino.modlib.users
plugin for storing what the customer calls “members”. We only “extended” it a
bit:
we change the
verbose_nameof theUsermodel from “User” to “Member”we add a field
placeto theUsermodel, which is a pointer to our table of places.
(19) Every plugin has a models.py file, which defines the
database models.
(20) The delivery_unit field is a choicelist field. This is
similar to a foreign key, but instead of pointing to a database row, it
points to a choice in a hard-coded table, which we call a choicelist. See
Introduction to choicelists.
(21) Most plugins also define data tables, and
by convention they are defined in a separate module, called ui.py
(which stands for user interface).
This is a good moment to return to read Introduction to layouts a second time.
(22) And last but not least it’s important to define
fixtures with demo data. Make sure you have read
Introduction to demo fixtures and then inspect our example file:
Exercises
(23) During the following exercises we’ll ask you to modify
source code in your copy of the book repository. After each
exercise, run git diff and report the output to your mentor. When you’ve
finished all exercises, run git checkout to undo your changes (your work
will be lost!).
(24) Add three delivery units “day” (after “hour”), “g” and “mg” (after “kg”).
(25) Add more people and products to your fixtures.
(26) Your customer wants the Demands panel on the left and the Offers panel on the right in the detail view of a product.
(27) Add a field “Weight” to the Product model.
Not finished
The remaining sections are work in progress. Sorry.
Filtering
Some hints:
Note that the Offers, Demands and Products tables now have a
 icon in
their toolbar. This is the main new feature. Play with it.
icon in
their toolbar. This is the main new feature. Play with it.The
Model.get_simple_parametersmethod (a class method on a database model) yields the name of database fields to be used as “table parameters”, i.e. the fields that appear in the “parameter panel” (the panel that expands and collapses when you hit the button). See
Introduction to actor parameters.
More
Maybe some helpful hints:
More about the application menu How plugins build the application menu
appypod : Generate printable documents from odt templates export_excel : Exporting to Excel
Verify
Actually even your simple prototype contains more than two plugins.
You can run the following code snippets in a Django shell session. If this was new for you, read Playing with the Django shell.
>>> from lino.api.doctest import *
>>> pprint(settings.SITE.installed_plugins)
(lino,
 lino.modlib.about,
 lino.modlib.jinja,
 lino_react.react,
 lino.modlib.system,
 lino_book.projects.lets1.lib.users,
 lino_book.projects.lets1.lib.market,
 django.contrib.staticfiles,
 django.contrib.sessions)
In reality is has more plugins because Lino installs certain plugins automatically, and because one plugin can require other plugins.